Jack Sutherland 3D Artist
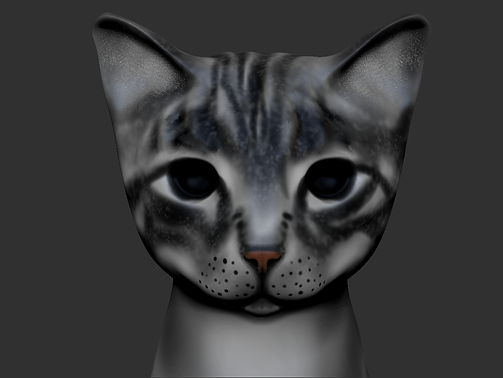
Dicky the cat
 |  |
|---|
< Click and drag image to rotate >
Tutorial Notes and Tips
I followed this in-depth tutorial on fibermesh by Daniel Bystedt. It's extremely useful but it's using an older version of ZBrush and there were some things not explained so I've tried to fill in the gaps that I had issues with.
These are some tips I used and learned from multiple tutorials for the creation of "Dicky".
1:
Model the cats face using ZSpheres and be sure to sculpt large wrinkles above eyes and between ears, use reference images every step of the way. This adds detail to the profile of the image and to change the direction of the hair.
2:
Place temporary spheres in place of eyes, this makes sculpting easier. These which will be replaced later with eyes modeled in Maya.
3:
Use poly paint, we will later use that information to control the hair colour. This way we can achieve a more accurate and realistic variation of coloured hair.
4:
Use multiple layers when using polypaint to allow for greater adjustments.
-
I used a base layer (white)
-
Black parts around the nose and eyes.
-
Black stripes
-
Random spots (large)
-
Random spots (small)
By creating multiple layers you can change the opacity of each layer which gives you more control.
Be sure to activate / deactivate layer recording when working on selected layers.
5:
Be sure to complete your polypaint before masking for fibermesh. If you don't, the fibermesh wont use any of the polypaint information for hair colour.
To be able to use polypaint information. You can select a fibermesh preset from the lightbox to start with (Or you can create your own).
Remove the preset texture and set the base colour to black and the tip colour to white.
For the “base colorise” set it to 1, and the “tip colorise” to 0. If you don't the polypaint will not show.
Also make sure to work with all polypaint layers visible, or merged. If you mask for fibermesh with just the base mesh visible, and then turn on visibility of polypaint layers and then hit preview with the current mask still active, your polypaint information wont appear.
6:
When masking for fibermesh , be aware that you cannot merge or groom multiple fibermesh subtools at a time. It is important to mask as much as possible, knowing you can always add more fibermesh later.
I masked the entire model and then un masked the eye sockets, nose and lips. Adjust the "Preview" fibers accordingly. Use BPR render to evaluate coverage, max fibers, tip scale, root scale, profile and segments.
Save each fibermesh profile before you accept them in case you need to redo a certain part or use it in another project.
Once you're happy with the fibers evaluate and then hit "Accept".
7:
Repeat step 6 if you need to add different style of hair. I needed to add 3 more fibermesh subtools.
-
Ear hair: Only mask one inside ear (You will copy the subtool and mirror it using "Deformation > Mirror" later). Cats ear hair is a lot finer, longer, and there's also not as much of it.
The position of the model on your screen affects how the gravity will react when you hit "preview". I turned my model to face down and outwards so the hair looks like it's going straight out and slightly outwards. This does not need to be perfect as it can be groomed later. Save fibermesh , accept. -
Whiskers: Whiskers are a lot longer, thicker and there are only a of them. I made sure to mask both sides of the face for fibermesh to avoid having perfectly symmetrical placement, and amount, this would look unnatural. Save fibermesh , accept.
-
Fine, short face hairs: Cats have lots of very fine, short hairs surrounding the nose, eyes, mouth and ears. I masked around these areas more than I needed to so they could be feathered into the main hair subtool naturally. Save fibermesh , accept.
8:
Once you're happy with the amount of fibers. You will then start grooming your hair into a more natural position. Dont spend too much time as you will need to do it over and over... I used GroomHairShort for the fine, short hairs and GroomHairLong for the rest.
A very important setting when using fibermesh is called "Front Collision Tolerance". This allows you to change how close to the mesh your fibers will react. The lower the number, the flatter they will be at the base to the mesh. The higher the number, the more they will stick out of the mesh. Very useful to use.
It can be found under Brush > fibermesh " You can't adjust this setting unless a fibermesh subtool and a grooming brush are selected.
To lengthen or shorten hairs I used "mask pen > color spray > alpha 40. Then mask over certain areas of fibers and then invert mask (ctrl, shift, left click canvas) and then scale.
9:
Model, texture and import eyes following this tutorial here
I had a lot of trouble assigning different materials to different subtools without it changing all of them.
Here are a few tips that should help if you're having similar problems.
-
Assign any material to each of your subtools. First, always make sure "M" or "Mrgb" is selected in your top toolbar. "M" will only change the material type whereas "Mrgb" will change the material and the colour you have selected in the color pallete. Select a subtool, pick a material, then under colour > fill object.
If less than 50% of your subtools are without a material they will all automatically be changed whenever you try to assign one. -
Be sure paint brush symbol and the eye symbol are activated under the subtool tab.
-
Tool > Save As and save your tool
-
Export each subtool as an individual tool, then open ZBrush and append each tool, to make one large tool.
-
Update to 4R6 P2
10:
Do a final groom using GroomHairShort, GroomHairLong and followed by GroomBrush1 to add random direction and flow.
I hope this helps and if you have any issues or queries I can be contacted here and I'll do my best to help!